Simple Integrations with Evetro's API - A brief guide
An Evetro API integration is a generated tuple which contains two string properties. They provide you the necessary credentials to receive access tokens for the Evetro API. This article details the process of setting up API integrations.


This guide describes how you can access our API outside of the Evetro App by means of simple integration scripting. It will show you how to register an API integration from the web app and attain a tuple of API credentials, how to store these credentials in personal projects and applications, how to obtain an access token using client credentials, and how to use this access token to query the Evetro API.
Part 1: Authenticating an app user versus authenticating an integration script
The process of authenticating an Evetro user is familiar and conventional. The user logs in with the help of a conventional and familiar login form presented by the Evetro client software, which is running in a web browser. In this form they may log in by typing in a password they previously chose for themselves when creating a standalone account in Evetro, or they may borrow credentials from their Google account or their GitHub account.
Whichever the kind of credentials submitted, the core principle is the same: In order to identify a user, the system's authentication service receives a piece of information from the user which confirms their identity by means of a knowledge factor, a password which only the user knows (presumably). Then, if the authentication process succeeds, the browser client receives a JSON webtoken which identifies the authenticated user. We refer to this token as the ID token.
Upon successfully logging in by providing the user's credentials to our authentication services, the browser client automatically receives an access token, along with the ID token, for the Evetro API, through the authentication flow Implicit Grant. For integration scripts, robots and other pieces of software which runs without a graphical interface through which an end user may control it, the Implicit Grant Flow cannot be implemented.
Thus, it makes more sense to authenticate the application, rather than an individual user, when it comes to communicating with a third party API via an app or a script. So instead, the authentication flow Client Credentials Grant will be employed for integrating apps and services with the Evetro API.
With the Client Credentials Grant a string value referred to as the client secret is and should be treated as the de facto password for authenticating an application against an API. Together with a client ID the client secret forms a set of values hereby referred to as the API credentials. Unlike a regular password, the client secret is not defined by the end user, but by the application's authorization service.
Part 2: Aquiring API credentials
When a third party application or automatically executing script is to make a request from Evetro's HTTP API, they must be eligible for receiving an access token. As dictated by the Client Credentials OAuth flow, they must present to our authentication service a client ID and its associated client secret, which together form the tuple "client credentials", hence the name of the authentication flow.
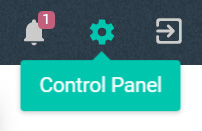
You may create one Evetro API credentials tuple per service you are integrating against the Evetro API. Upon landing on the home page on the Evetro Web App, click on the cog wheel to access the Control Panel.
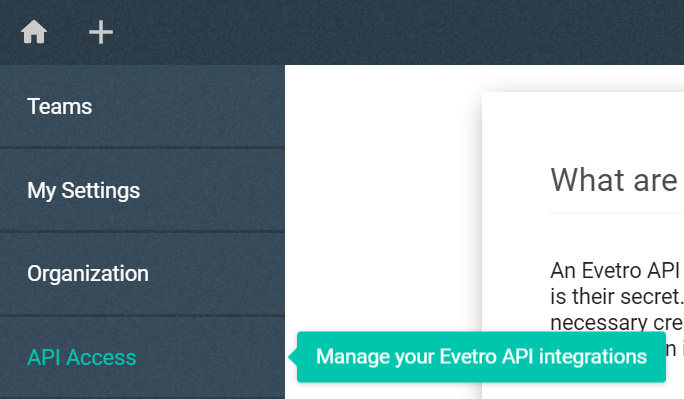
Then click on the tab API Access.
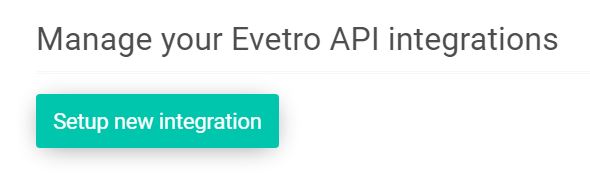
You will want to complete the following instructions in order to register a valid, functional API integration. For starters, click on the button Setup new integration.
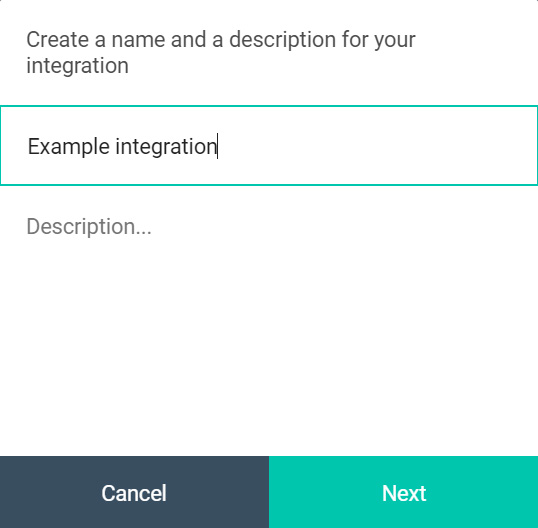
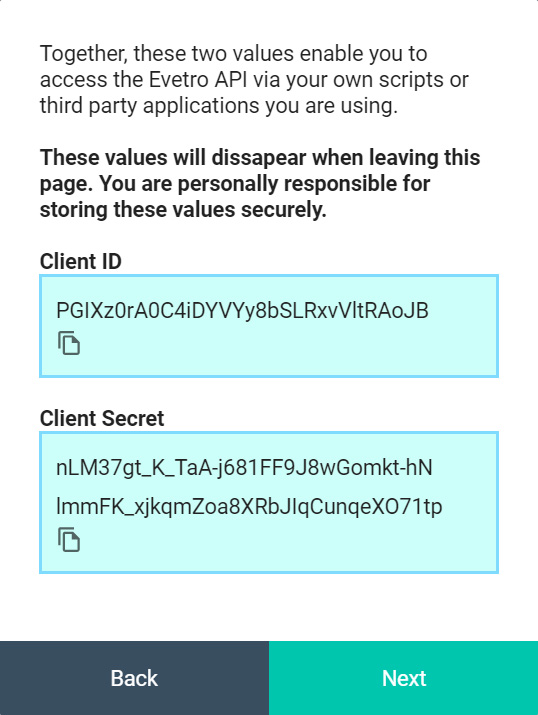
Notice that a dialog box will show up prompting you with providing two details: a name and a description. The name is supposed to help you identify each individual API client of yours, and it is restricted to at least one and at most 80 characters in length. The description is only meant as an optional flavor text explaining the purpose of the API client, and has no bearing whatsoever on the client credentials generation.
Upon submitting these two string values to our application server, you will receive the API credentials in the form of a plain JavaScript object. You absolutely must copy each of the client ID and the client secret, and save them as environment variables in a .env file in the project you are attempting to integrate with the Evetro API. You may define the following variables in the environment file:
EVETRO_CLIENT_ID={RECEIVED CLIENT ID}
EVETRO_CLIENT_SECRET={RECEIVED CLIENT SECRET}
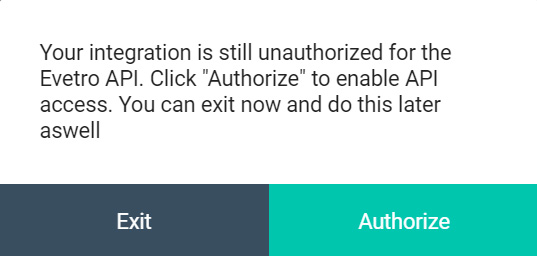
You will see a button labeled "Authorize". Click on it to enable access to the Evetro API for your client integration. If your inegration is not authorized to contact the Evetro API, you will receive a "403 Unauthorized" response whenever you send an HTTP request to it.
Part 3: Using the API credentials to attain access tokens
You will typically want to implement a separate software module which deals with the details regarding contact with the authorization server. You may also want to install a third party module which reads an .env file in which you have stored your client credentials as well as the URI of the Evetro API you have integrated against. If you were logged on the domain app.evetro.com when you created the integration and authorized it, then you can query the API located at the URI https://app.evetro.com/api.
Be aware that the code example we list in the following subsections refer to two different environment variables. The code assumes that they are a defined in a file called .env, and that this file is located in the root directory of your integration source code. The variables we use in our examples are the following:
EVETRO_CLIENT_ID- The client ID, defined by the client credentials you received upon creating your API integrationEVETRO_CLIENT_SECRET- The client secret, defined by the client credentials you received upon creating your API integration
Seeing as the token you will receive is valid for 24 hours, we recommend storing it in a timed, persistent cache for optimal HTTP request performance.
NodeJS
Make sure that both dotenv and node-fetch are installed in your integrating project.
npm i dotenv node-fetch
Sending a POST request to the authorization server in NodeJS may look something like this:
// file 'requestToken.js'
const fetch = require(node-fetch);

/** @returns {Object} the response body, which contains
the properties 'access_token', 'scope', 'token_type'
and 'expires_in' */
module.exports = processEnv => fetch(
  'https://auth.evetro.com/token',
  {
    method: 'POST',
    headers: {
      Accept: 'application/json',
      'Content-Type': 'application/json',
    },
    body: JSON.stringify({
      grant_type: 'client_credentials',
      client_id: processEnv.EVETRO_CLIENT_ID,
      client_secret: processEnv.EVETRO_CLIENT_SECRET,
      audience: 'https://app.evetro.com/api',
    }),
  },
).then(fetchResponse => fetchResponse.json());
Upon importing this module, make sure your environment variables have been loaded into the runtime.
const path = require('path');
require('dotenv').config({
  path: path.resolve(process.cwd(), '.env')
});
const requestToken = require('./requestToken');
// ...
requestToken(process.env)
  .then(fetchResponse => fetchResponse.json())
  .then(({ access_token, expires_in }) => {
    // Handle the received access token here.
    // You may for example store it in a timed, persistent cache
});
Python
First, see to that python-dotenv is installed.
pip install -U python-dotenv
Then, a separate python module, which fetches a valid access token, might look like this.
# filename: evetro_token.py
from urllib.request import urlopen, Request
import json
import os

# returns the response body in JSON format,
# which contains the properties 'access_token',
# 'scope', 'token_type' and 'expires_in'
def request_token():
    data = json.dumps({
        'grant_type': 'client_credentials',
        'client_id': os.getenv("EVETRO_CLIENT_ID"),
        'client_secret': os.getenv("EVETRO_CLIENT_SECRET"),
        'audience': 'https://app.evetro.com/api'
    })
    headers = {
        "Accept": "application/json",
        "Content-Type": "application/json"
    }
    req = Request(
        'https://auth.evetro.com/token',
        data.encode('ascii'),
        headers,
        method='POST'
    )
    with urlopen(req) as response: # blocking code
        return json.load(response)
# Import environment loader
from dotenv import load_dotenv
import evetro_token

load_dotenv()

response_body = request_token()
# Handle the received access token here.
# You may for example store it in a timed cache
# The access token is in this property
# response_body['access_token']
# Its lifespan, denoted in seconds, is in this property
# response_body['expires_in']
Ruby
To run this example code, you must include the dotenv module in the integrating project.
gem install dotenv
The code example makes use of the core modules uri, net/http, and json. Alternatively, you can install an external request adapter, such as faraway, or an HTTP request wrapper, such as httparty.
# filename: evetro.rb
require 'uri'
require 'net/http'
require 'openssl'
require 'json'

module Evetro
  # returns the response body in JSON format,
  # which contains the properties 'access_token',
  # 'scope', 'token_type' and 'expires_in'
  def Evetro.get_new_token
    uri = URI('https://auth.evetro.com/token')
    https = Net::HTTP.new(uri.host, uri.port)
    https.use_ssl = true
    https.verify_mode = OpenSSL::SSL::VERIFY_NONE
    obj = {
      grant_type: 'client_credentials',
      client_id: ENV['EVETRO_CLIENT_ID'],
      client_secret: ENV['EVETRO_CLIENT_SECRET'],
      audience: 'https://app.evetro.com/api'
    }
    request = Net::HTTP::Post.new(uri.path)
    request['Content-Type'] = 'application/json; charset=UTF-8'
    request['Accept'] = 'application/json; charset=UTF-8'
    request.body = obj.to_json
    response = https.request(request) # blocking code
	  return response.read_body
  end
end
require_relative './evetro.rb'
require 'json'
# Import environment loader
require 'dotenv'

Dotenv.load

response_body = JSON.parse(Token.get_new_token())
# Handle the received access token here.
# You may for example store it in a timed cache
# The access token is in this property
# response_body['access_token']
# Its lifespan, denoted in seconds, is in this property
# response_body['expires_in']
Do note that each access token has a very limited lifespan, and are rendered useless once they reach that age. In your production environment, you will have to get a new one programmatically when the access token eventually expires.
Part 4: Sending GraphQL queries with the integration
Now that your running application has gotten hold of a valid access token, now is the time to use it with HTTP requests to the Evetro API. As a concrete use case example, imagine you are interested in reading all of the actions you have not checked off yet (perchance your app is intended to display them nicely in a view?) with your app. Here is the GraphQL query you would want to send the Evetro API.
# Selects all of my own actions that are incomplete
query {
  actions(mine: true, isDone: false) {
    description
    date
    notes { content, date, groupWord, question }
  }
}
NodeJS
// file 'queryApi.js'
const fetch = require(node-fetch);

module.exports = (
  accessToken,
  query,
  processEnv
) => fetch('https://app.evetro.com/api', {
  method: 'POST',
  headers: {
    authorization: `Bearer ${accessToken}`,
    Accept: 'application/json',
    'Content-Type': 'application/json',
  },
  body: JSON.stringify({ query }),
}).then(fetchResponse => fetchResponse.json());
Upon importing this module, make sure your environment variables have been loaded into the runtime.
const path = require('path');
require('dotenv').config({
  path: path.resolve(process.cwd(), '.env')
});
const requestToken = require('./requestToken');
const queryApi = require('./queryApi');

const actionsQuery = `query {
  actions(mine: true, isDone: false) {
    description
    date
    notes { content, date, groupWord, question }
  }
}`;

requestToken(process.env)
  .then(({
    access_token: accessToken, expires_in,
  }) => queryApi(
    accessToken,
    actionsQuery,
    process.env,
  )).then(({ data: { actions } }) =>
    /** Handle query result here,
    f.ex set a state or console.log */
);
Python
Note: The f-string feature in Python is available as of version 3.6.4.
# filename: evetro_query.py
from urllib.request import urlopen, Request
import json
import os

def query_graphql(q, token):
    data = json.dumps({ 'query': q })
    headers = {
        'authorization': f'Bearer {token}',
        "Accept": "application/json",
        "Content-Type": "application/json"
    }
    req = Request(
        'https://app.evetro.com/api',
        data.encode('ascii'),
        headers,
        method='POST'
    )
    with urlopen(req) as response: # blocking code
        return json.load(response)
Combined with the previously defined Python function request_token, we can write the following script if no persistent token cache has been installed.
# Import environment loader
from dotenv import load_dotenv
import evetro_token
import evetro_query

load_dotenv()

response_body = request_token()
graphql_query = """query {
  actions(mine: true, isDone: false) {
    description
    date
    notes { content, date, groupWord, question }
  }
}"""
query_response = query_graphql(
    graphql_query,
    response_body['access_token']
)
retrievedActions = query_response['data']
# Handle the query result here
Ruby
We will expand the integration "file" labeled evetro.rb from the previous Ruby example to also export a function which POSTs a GraphQL query to the Evetro API.
# filename: evetro.rb
require 'uri'
require 'net/http'
require 'openssl'
require 'json'

module Evetro
  # Code omitted for brevity

  # returns the response body in JSON format,
  # which contains the properties 'access_token',
  # 'scope', 'token_type' and 'expires_in'
  def Evetro.query_api(q, token)
    uri = URI('https://app.evetro.com/api')
    https = Net::HTTP.new(uri.host, uri.port)
    https.use_ssl = true
    https.verify_mode = OpenSSL::SSL::VERIFY_NONE
    obj = { query: q }
    request = Net::HTTP::Post.new(uri.path)
    request['authorization'] = 'Bearer #{token}'
    request['Content-Type'] = 'application/json; charset=UTF-8'
    request['Accept'] = 'application/json; charset=UTF-8'
    request.body = obj.to_json
    response = https.request(request) # blocking code
	return response.read_body
end
To run the GraphQL query, we can write this short script in the same directory as the one we've put the file evetro.rb.
require_relative './evetro.rb'
require 'json'
# Import environment loader
require 'dotenv'

Dotenv.load

response_body = JSON.parse(Token.get_new_token())

graphql_query = "query {
  actions(mine: true, isDone: false) {
    description
    date
    notes { content, date, groupWord, question }
  }
}"
query_response = query_graphql(
  graphql_query,
  response_body['access_token']
)
retrievedActions = query_response['data']
# Handle the query result here
Part 5: Conclusion and getting help
This guide has demonstrated how a user of Evetro may define an API integration from within the web application. When an API integration is submit, the returned JSON object has the properties clientID (the ID of the integration) and secret (the integration key string used to authenticate against our authentication service).
We strongly recommended that you store these two values as environment variables in the source code of your integration script, which is essential for these. Through code examples in Python, Ruby and Javascript, I have illustrated how integrations may be written as modular plugins to an existing source code.
An Evetro API integration enables you to access the Evetro API via your own scripts or third party applications you are using. Your software uses the generated credentials to authenticate with the API, which in turn provides it with access tokens the API requires to authorize GraphQL queries.
Keep in mind that the client secret an API integration is a personal password. Do not share your generated API credentials with anyone, and do not store it directly in code posted on remote repositories. Also, we strongly advise against reusing the same API credentials for several integration scripts. Think of it as reusing the same user password across different services and systems.
Be aware that we do NOT store your client secret in any capacity. Once you create an integration, you must copy the client ID and the client secret presented in the blue boxes to the right of the form, and paste into the environment file (.env), which governs secrets such as API credentials, in the software project you are integrating against the Evetro API.
If you need further help with getting your Evetro API queries to work properly, you can reach us on the support email address, support at evetro dot com. Make sure to visit the Evetro API documentation to see our GraphQL query examples for each valid query or mutation entity.